“(Knitting) is very technical.”
This was what my dad had to say after I showed him a hat I was working on one evening. Before he said that, I had never thought of knitting in that manner. I would extend this frame of thinking to crochet as well-both crafts fundamentally transform a piece of yarn into fantastic pieces. ‘Fantastic’ purely in the sheer amount of effort and skill needed to turn one element into an entirely new thing. I specify this, because even though it is a skill just learning how to maneuver yarn with a hook/two or more needles, it doesn’t necessarily mean each piece made will be functional, or visually appealing. Every knitter can immediately recount their best and worst piece. But how can we ensure that every piece we spend our time, materials and patience on comes out at least halfway decent?
By focusing on the Technicality of each piece.
Here, I am using the term Technical/Technicality as an all encompassing term to describe the thought put into the design of a piece, from the shaping, the hook/needle sizes, type of yarn and even type of stitches used for each piece. This article may be particularly of use to newcomers to the craft, who haven’t yet learned how to choose each element of their piece with care. I’ll break this concept down into several categories, and include examples of my own works to draw from.
Materials
The very first thing I consider when embarking on a new project is the type of yarn I will use. When I first started out, I focused solely on color and softness/durability of the yarn. The only yarn stores I knew then were Michael’s and my local Save-a-Thon, and I didn’t even understand that there were different types of yarn I could choose from. All I knew of back then were Acrylics and the occasional cotton. I didn’t care about gauge, or even consider the size of the yarn. I mostly purchased Red Heart Super Saver and Caron One -Pound. As a result, a lot of my early pieces were hit-or-miss. I would get a delicate stitch down, but have the stitch be obscured by the thick yarn and mismatched hook size. I wouldn’t take into account how a stitch could be resized/modified to suit a heavier yarn. Or, I would finish a piece, only to have it come out look too thick/clumsy because the intent was for the piece to be thin and lacy. And this doesn’t even account for how well the type of yarn chosen would hold up to wear and tear. I would implore everyone to study the piece before purchasing materials, and gain an understanding of why the particular recommended yarn in a pattern was chosen.

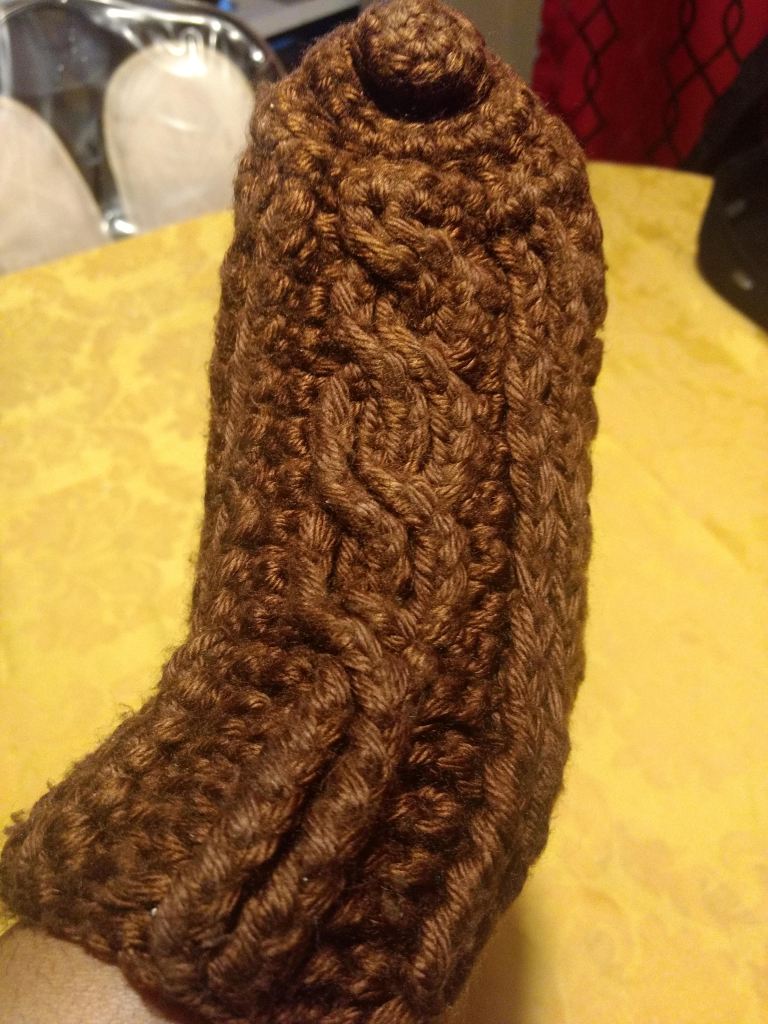
Above you will see two images of a glove I finished December 2019. I think everyone can agree that the piece above looks old and well used, as if it had been worn a thousand times and poorly maintained. This is an example of the consequences of using the wrong type of yarn for a project. Remember, I made this piece in DECEMBER 2019. It is March 2020 at the time of this article-the condition of this piece should not have deteriorated so quickly.
The yarn used for this piece was Caron Simply Soft. A quick search of this yarn on Google images brings up pictures on the label of hats, finger-less gloves, scarves and blankets. The yarn seems ideal for projects that will have close contact to the skin, as the yarn is indeed soft. But it quickly falls apart when put through its paces. I posted this complaint in a crochet group and got similar complaints of the yarn frequently fraying/shedding fibers. Unfortunately, there was no reason for me to look up the performance of this yarn before purchasing.
So what things should we consider when it comes to material?
First, how will we be using the pieces we make? Something like a glove will be used for warmth and to help facilitate tasks. We may carry heavy or rough materials from time to time (a grocery tote, for example), tasks that create a lot of friction between the glove and the object being handled. We may also come in contact with less than pristine surfaces (dirty bus /train handles, a work entrance to a building, etc.) So for something like a glove, perhaps it is better to use colors that can conceal dirt well. A yarn that can withstand a lot of friction (anti-pilling, for example) is also ideal. You don’t want to use a yarn that is fragile for something that will get a lot of rough use.
Next, how does the yarn behave? As seen in the example above, certain yarns have the tendency to fray with intense friction. Other things to look at include breathe-ability. While the gloves are warm, Acrylic does not breath well; my hands often sweat while wearing the glove. The same is true for the scarves and hats knit with Acrylic. If the piece being made will be worn often before its next wash, maybe consider using materials such as wool, which has natural moisture-wicking properties. Cotton, on the other hand, may be too light for winter wear, but perfect for summer clothing. You should also consider how well the material drapes. Certain acrylics and cottons have a stiff structure (Red Heart Super Saver and Sugar n’ Cream Cotton Yarn instantly come to mind), and may be better suited to projects needing structure such as handbags and hats, versus sweaters/shawls.
Finally, how does the weight/size of yarn interact with the stitch and clothing item? If a pattern calls for a superfine yarn, you will obviously not get the same effect if you go for medium weight yarn. The thin nature of superfine yarn will better display the delicate lace pattern, which the thicker yarn may obscure. Choosing the wrong weight may also affect the drape of a project (i.e. using too thick a yarn may cause the fabric to come out stiff/not malleable).
Admittedly, I had no way of knowing that this yarn would perform so strangely before purchasing. However, even though I could not exchange the yarn once used/cut, I could have made a swatch and test it by rubbing it frequently against my hands and coat. Of course, I didn’t think to do this, and so I spent far too much time drafting/frogging this piece for it to come out looking like this.
Stitches/Shaping

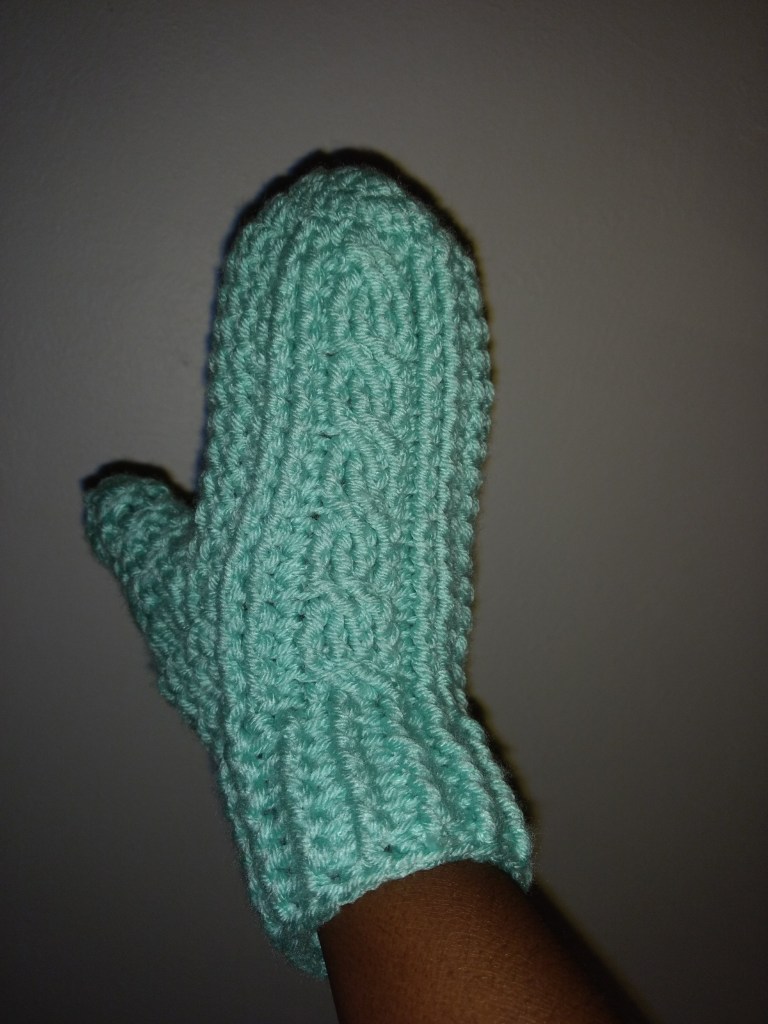


As the caption of both sets of pictures above indicate, each of these pieces are a modified version of a pattern I found. First, a disclaimer-I think Stephanie is a fabulous creator, who pays attention to aesthetic and creates very classy pieces. The issues I will list are a side effect of my modifications, and not using the yarn she recommended (there is a reason for the choice of yarn each pattern designer uses).
The first version of the Cable Crochet Gloves I attempted is the one that most resembles the original. I kept the stitches used in the original pattern, and only modified the thumb so that there was an opening. Obviously the yarn used is not the same as the one she used in her pattern (for reference, she used Lion Brand Heartland). The immediate issue I faced with this pattern (no offense to the original pattern) was the stitch used. At the time of making the first glove, I was going to school in Buffalo. The winter winds were brutal (lake effect is SERIOUS up there), and there were simply too many holes where the sharp winds could pass through, rendering these cute gloves ineffective.
The last version of the Cable Crocheted gloves I attempted are the brown gloves. They are thicker and lumpier. The lumpiness can be attributed to me not following the original stitch count-while the weight of the original pattern’s yarn and Caron Simply Soft is the same, my hands are very small, so I had to reduce the stitches in the glove to fit my hand. I may not have accounted for the balance between the stitches and the cable. And the thickness of the glove? I crocheted using two strands of yarn, modified the stitch (using connected double crochet instead of regular double crochet), and crocheted through the remaining holes of the gloves using two strands of yarn. The result? While the mittens admittedly resemble boxing gloves, I only feel some wind passing through the sides of the cable (I didn’t run additional yarn through there).
So what is there to learn from these mistakes?
First, the behavior of a stitch is an important factor to consider when designing a piece. The original piece, while gorgeous, will not stand up to brutal NYC/ Upstate New York winters. Double crochet is lacy in nature. While it would work fine in sweaters (especially if you are making them using Acrylic yarn, which does not breathe), it does not offer nearly enough protection for your extremities. This piece would probably offer more warmth if worked in single crochet.
Next , the stitch count/balance is critical for shaping a piece. When making my latest modification, I sacrificed the delicate shaping of the glove to ensure that it fit closely to my hand. I included decreases where it was not needed, and dropped stitches far too often (I made the glove when the cold weather was coming in, and I was on a time crunch). The glove would look much better had I taken more time during its construction.


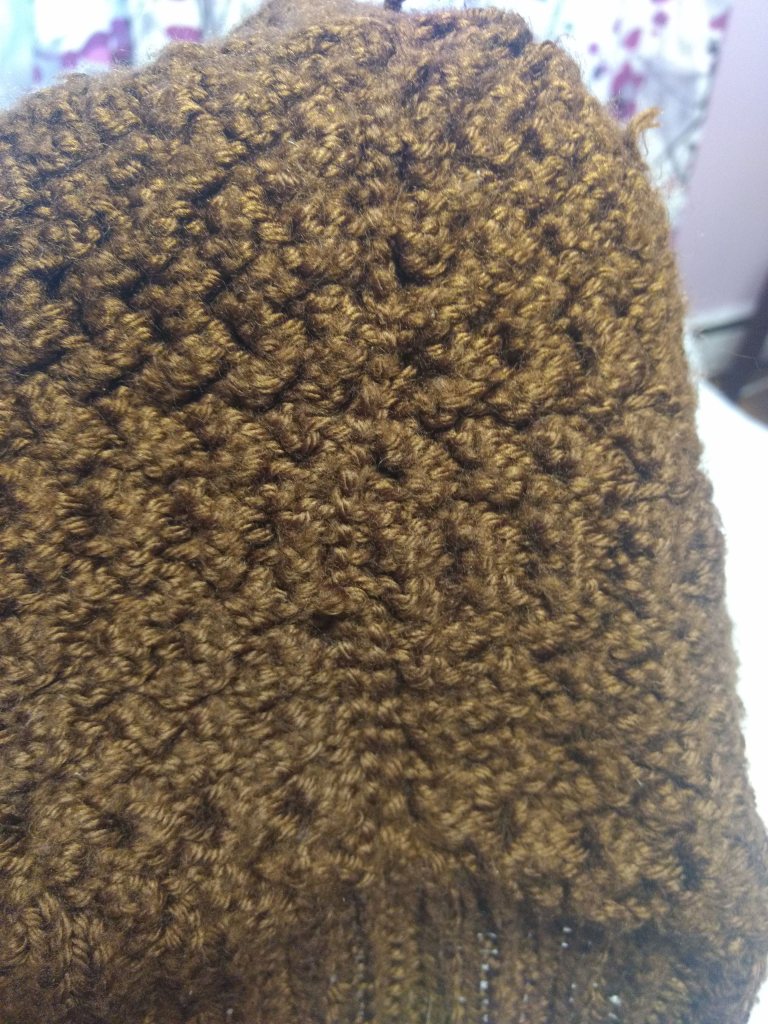
The pictures above are of a self drafted hat, using the Woven Cable knit stitch. The concept was simple. Just cast on the number of stitches you normally would for a hat, do your ribbed rows to create the brim, and move onto the stitch from there. So what issues are there with the hat?
One: I started to decrease too early. I knit this hat on double pointed needles. When I wanted to test the fit, I would move them onto circular needles with a long cord and fit it over my head. When I thought it was an OK point to start decreasing, I should have added at least three more repeats to the cable. As a result, the hat, while cute, needs to be constantly dragged down.
Two: Not understanding the nature of the stitch. This cable stitch is not very flexible. Additionally, it needs constant tension. Where my tension slacked with each cable, holes appeared. This led to the edit on the third picture, where the holes were noticeable in the front. You can’t really see the edits from the front, as I preformed the edits from the back of the hat and made sure to mimic the k/p stitch that would have been in that area. Since this stitch is tight, the ‘additional’ stitch doesn’t hurt here.
It looks like I was hard on myself for the mistakes I made, but I feel proud of each complete object made. Lessons were learned with each piece, and I take these lessons over to my future pieces. My philosophy with any skill is that we should look at every mishap as a ‘Happy’ mistake.
In the effort to document lessons learned from each piece, I will update this particular post every time I finish working on a piece. I work slow, but I hope I will be able to share any new lessons with you guys.
Happy crafting!
